Mental Model
Nx is a VSCode of build tools, with a powerful core, driven by metadata, and extensible through plugins. Nx works with a few concepts to drive your monorepo efficiently, and effectively. This guide covers the mental model around how Nx works with project graphs, task graphs, affected commands, computation hashing and caching.
The project graph
A project graph is used to reflect the source code in your repository and all the external dependencies that aren’t authored in your repository, such as Webpack, React, Angular, and so forth.
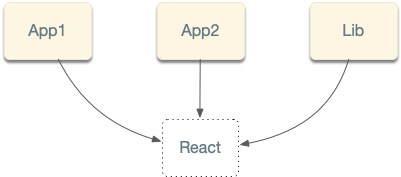
With Nx, nodes in the project graph are defined in workspace.json. You can manually define dependencies between the nodes, but you don’t have to do it very often. Nx analyzes files’ source code, your installed dependencies, TypeScript files, and others figuring out these dependencies for you. Nx also stores the cached project graph, so it only reanalyzes the files you have changed.
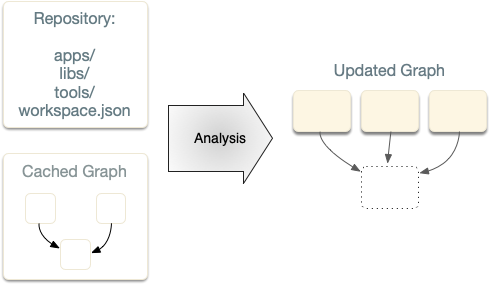
Nx provides an updated graph after each analysis is done.
Metadata-driven
Everything in Nx comes with metadata to enable toolability. The default values, validations, autocompletion work, and more are all defined in a schema, instead of in code.
The following sample schema shows inputs, prompts, and validations for adding a new application.
1{
2  "$schema": "http://json-schema.org/schema",
3  "cli": "nx",
4  "$id": "NxNextApp",
5  "title": "Create an Application for Nx",
6  "type": "object",
7  "properties": {
8    "name": {
9      "description": "The name of the application.",
10      "type": "string",
11      "$default": {
12        "$source": "argv",
13        "index": 0
14      },
15      "x-prompt": "What name would you like to use for the application?",
16      "pattern": "^[a-zA-Z].*$"
17    },
18    "directory": {
19      "description": "The directory of the new application.",
20      "type": "string",
21      "alias": "d"
22    },
23    "style": {
24      "description": "The file extension to be used for style files.",
25      "type": "string",
26      "default": "css",
27      "alias": "s",
28      "x-prompt": {
29        "message": "Which stylesheet format would you like to use?",
30        "type": "list",
31        "items": [
32          { "value": "css", "label": "CSS" },
33          {
34            "value": "scss",
35            "label": "SASS(.scss)       [ http://sass-lang.com          ]"
36          },
37          {
38            "value": "styl",
39            "label": "Stylus(.styl)     [ http://stylus-lang.com        ]"
40          },
41          {
42            "value": "less",
43            "label": "LESS              [ http://lesscss.org            ]"
44          }
45        ]
46      }
47    },
48    "linter": {
49      "description": "The tool to use for running lint checks.",
50      "type": "string",
51      "enum": ["eslint", "tslint"],
52      "default": "eslint"
53    },
54    "skipFormat": {
55      "description": "Skip formatting files",
56      "type": "boolean",
57      "default": false
58    },
59    "skipWorkspaceJson": {
60      "description": "Skip updating workspace.json with default options based on values provided to this app (e.g. babel, style)",
61      "type": "boolean",
62      "default": false
63    },
64    "unitTestRunner": {
65      "type": "string",
66      "enum": ["jest", "none"],
67      "description": "Test runner to use for unit tests",
68      "default": "jest"
69    },
70    "e2eTestRunner": {
71      "type": "string",
72      "enum": ["cypress", "none"],
73      "description": "Test runner to use for end to end (e2e) tests",
74      "default": "cypress"
75    },
76    "tags": {
77      "type": "string",
78      "description": "Add tags to the application (used for linting)",
79      "alias": "t"
80    },
81    "js": {
82      "type": "boolean",
83      "description": "Generate JavaScript files rather than TypeScript files.",
84      "default": false
85    },
86    "setParserOptionsProject": {
87      "type": "boolean",
88      "description": "Whether or not to configure the ESLint \"parserOptions.project\" option. We do not do this by default for lint performance reasons.",
89      "default": false
90    }
91  },
92  "required": []
93}
This metadata is used by Nx itself, by VSCode and WebStorm integrations, by GitHub integration, and by third-party tools.
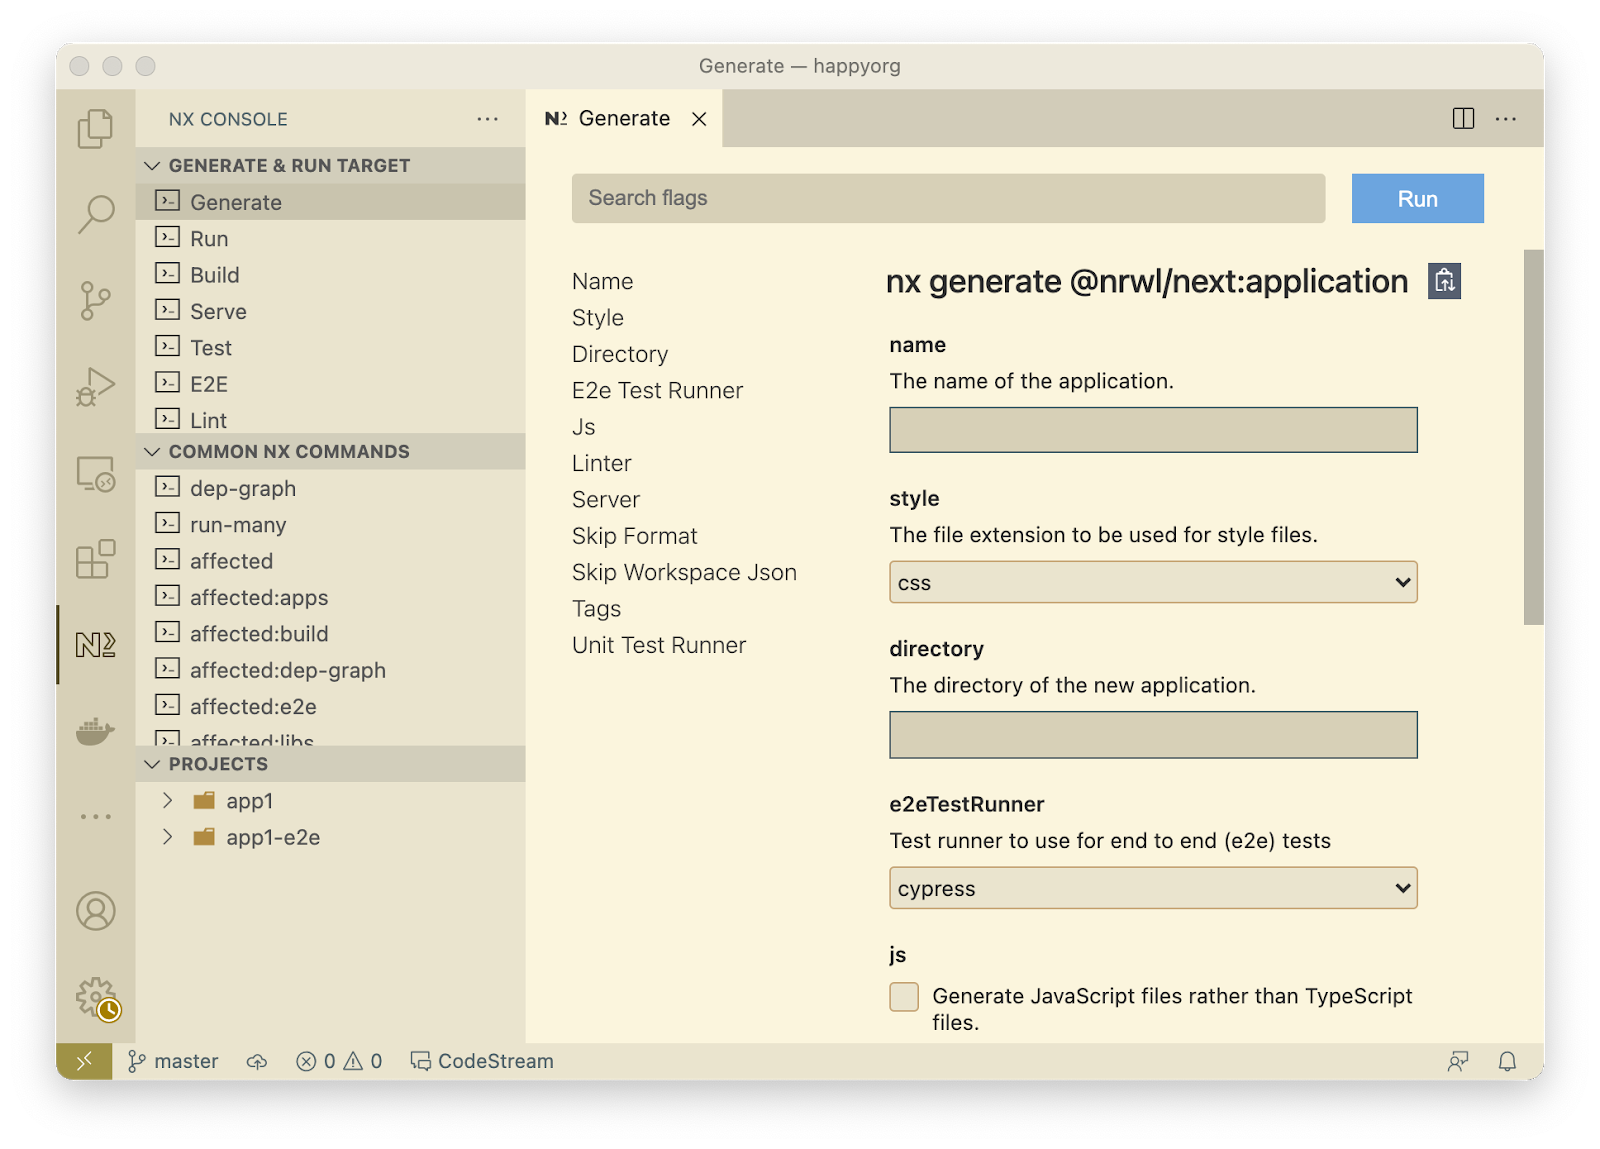
These tools are able to implement richer experiences with Nx using this metadata.
The task graph
Nx uses the project graph to create a task graph. Any time you run anything, Nx creates a task graph from the project graph and then executes the tasks in that graph.
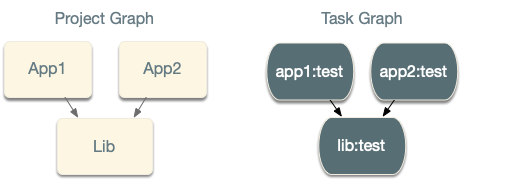
For instance nx test lib creates a task graph with a single node:

A task is an invocation of a target. If you invoke the same target twice, you create two tasks.
Nx uses the project graph, but the task graph and project graph aren’t isomorphic, meaning they aren’t directly connected. In the case above, app1 and app2 depend on lib, but running nx run-many --target=test --projects=app1,app2,lib, the created task graph will look like this:
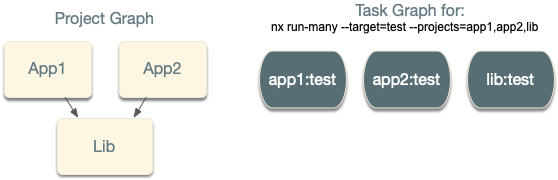
Even though the apps depend on lib, testing app1 doesn’t depend on the testing lib. This means that the two tasks can run in parallel.
Let’s look at the test target relying on its dependencies.
1{
2  "test": {
3    "executor": "@nrwl/jest:jest",
4    "outputs": ["coverage/apps/app1"],
5    "dependsOn": [{ "target": "test", "projects": "dependencies" }],
6    "options": {
7      "jestConfig": "apps/app1/jest.config.js",
8      "passWithNoTests": true
9    }
10  }
11}
With this, running the same test command creates the following task graph:
This often makes more sense for builds, where to build app1, you want to build lib first. You can also define similar relationships between targets of the same project, including a test target that depends on the build.
A task graph can contain different targets, and those can run in parallel. For instance, as Nx is building app2, it can be testing app1 at the same time. Learn more about configuring targets in the configuration guide
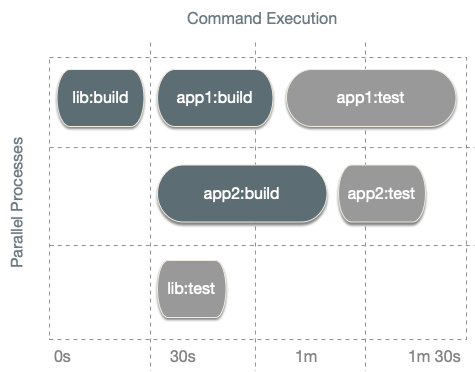
Nx also runs the tasks in the task graph in the right order. Nx executing tasks being executed speeds up your overall execution time.
Affected commands
When you run nx test app1, you are telling Nx to run the app1:test task plus all the tasks it depends on.
When you run nx run-many --target=test --projects=app1,lib, you are telling Nx to do the same for two tasks app1:test and lib:test.
When you run nx run-many --target=test --all, you are telling Nx to do this for all the projects.
As your workspace grows, retesting all projects becomes too slow. To address this Nx implements code change analysis to get the min set of projects that need to be retested. How does it work?
When you run nx affected --target=test, Nx looks at the files you changed in your PR, it will look at the nature of change (what exactly did you update in those files), and it uses this to figure the list of projects in the workspace that can be affected by this change. It then runs the run-many command with that list.
For instance, if my PR changes lib, and I then run nx affected --target=test, Nx figures out that app1 and app2 depend on lib, so it will invoke nx run-many --target=test --projects=app1,app2,lib.
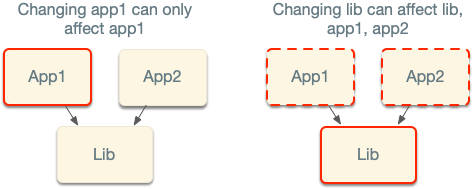
Nx analyzes the nature of the changes. For example, if you change the version of Next.js in the package.json, Nx knows that app2 cannot be affected by it, so it only retests app1.
Computation hashing and caching
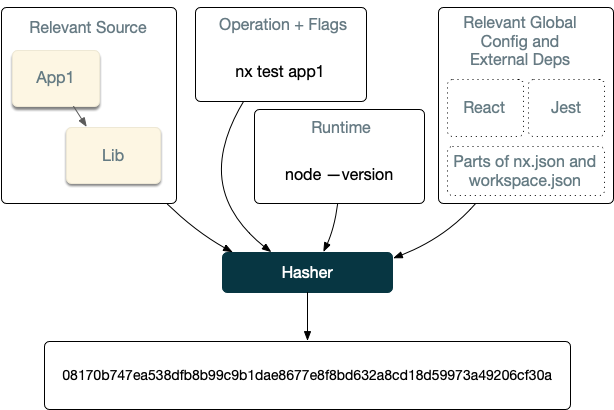
Nx runs the tasks in the task graph in the right order. Before running the task, Nx computes its computation hash. As long as the computation hash is the same, the output of running the task is the same.
How does Nx do it?
By default, the computation hash for say nx test app1 includes:
- All the source files of
app1andlib - Relevant global configuration
- Versions of externals dependencies
- Runtime values provisioned by the user such as the version of Node
- Command flags
This behavior is customizable. For instance, lint checks may only depend on the source code of the project and global configs. Builds can depend on the dts files of the compiled libs instead of their source.
After Nx computes the hash for a task, it then checks if it ran this exact computation before. First, it checks locally, and then if it is missing, and if a remote cache is configured, it checks remotely.
If Nx finds the computation, Nx retrieves it and replay it. Nx places the right files in the right folders and prints the terminal output. So from the user’s point of view, the command ran the same, just a lot faster.
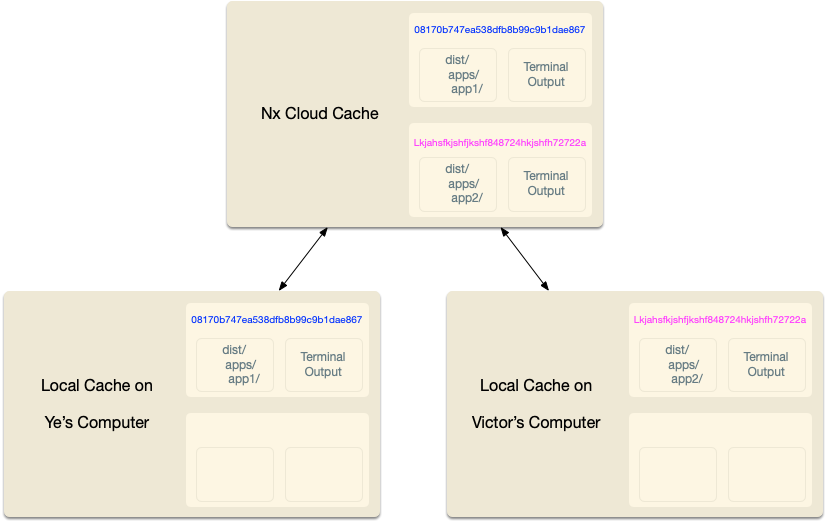
If Nx doesn’t find this computation, Nx runs the task, and after it completes, it takes the outputs and the terminal output and stores it locally (and if configured remotely). All of this happens transparently, so you don’t have to worry about it.
Although conceptually this is fairly straightforward, Nx optimizes this to make this experience good for you. For instance, Nx:
- Captures stdout and stderr to make sure the replayed output looks the same, including on Windows.
- Minimizes the IO by remembering what files are replayed where.
- Only shows relevant output when processing a large task graph.
- Provides affordances for troubleshooting cache misses. And many other optimizations.
As your workspace grows, the task graph looks more like this:
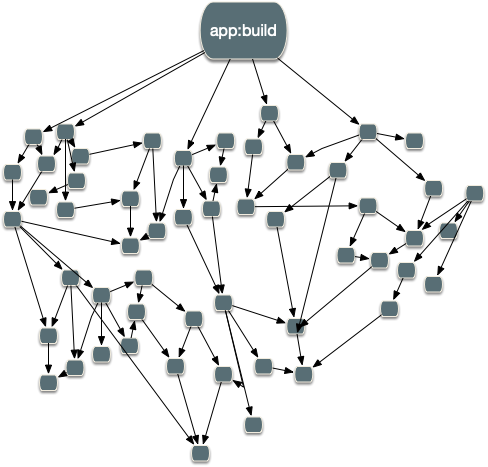
All of these optimizations are crucial for making Nx usable for any non-trivial workspace. Only the minimum amount of work happens. The rest is either left as is or restored from the cache.
In summary:
- Nx is able to analyze your source code to create a Project Graph.
- Nx can use the project graph and information about projects’ targets to create a Task Graph.
- Nx is able to perform code-change analysis to create the smallest task graph for your PR.
- Nx supports computation caching to never execute the same computation twice. This computation cache is pluggable and can be distributed.